
Spherical Video: Unveiling RidgeRun CUDA Stitching's 360° Video Capabilities
- Edison Fernandez
- Jul 12, 2023
- 3 min read

Updated: Apr 17, 2024
We are happy to share with you our progress on an exciting update that will enhance your video projects. RidgeRun CUDA Stitcher has now integrated support for spherical video. This new feature empowers you to explore the immersive world of 360-degree video and unlock a range of creative possibilities for your applications using the familiar RidgeRun Stitcher.
Spherical video has gained popularity for its ability to provide an immersive experience, allowing viewers to explore a scene from all angles. With RidgeRun CUDA Stitcher's spherical video support, you now have the capability to stitch together footage from multiple cameras, creating a seamless 360-degree view. This allows you to capture panoramic shots, dynamic action sequences, and immersive environments that can enhance your user experience.
What is Spherical Video?
Spherical video is a type of video recording that captures a complete 360-degree view of the surrounding environment. Unlike traditional videos that have a fixed frame or perspective, spherical video enables viewers to explore the footage and look in any direction, as if they were physically present in the scene. It provides a truly immersive experience, allowing individuals to engage with the content and feel a sense of presence in the virtual environment.
To create a spherical video, multiple cameras (usually with fisheye lenses) are used. These cameras capture footage simultaneously from different angles, covering the entire spherical field of view.

The captured video is then mapped to an equirectangular projection. An equirectangular projection, also known as a spherical projection or 360-degree projection, is a technique used to represent the entire surface of a sphere onto a 2D plane. The following picture shows how this image is projected.

Finally, the projected video is then stitched together to create a seamless 360-degree view. The stitching process ensures that the transitions between different camera perspectives are smooth and natural, providing a cohesive and immersive experience for viewers.
How RidgeRun Spherical Video Works?
The process starts by defining your setup. You have to choose an array of cameras and lenses that ensure you are covering the full 360-degree area. Take the following picture as an example.

We have 3 cameras with 180-degree fis
heye lenses with 120-degree separation from each other. With this configuration, we not only make sure we are covering the whole 360 degrees but also have overlapping regions between the cameras which is essential for the stitching process.
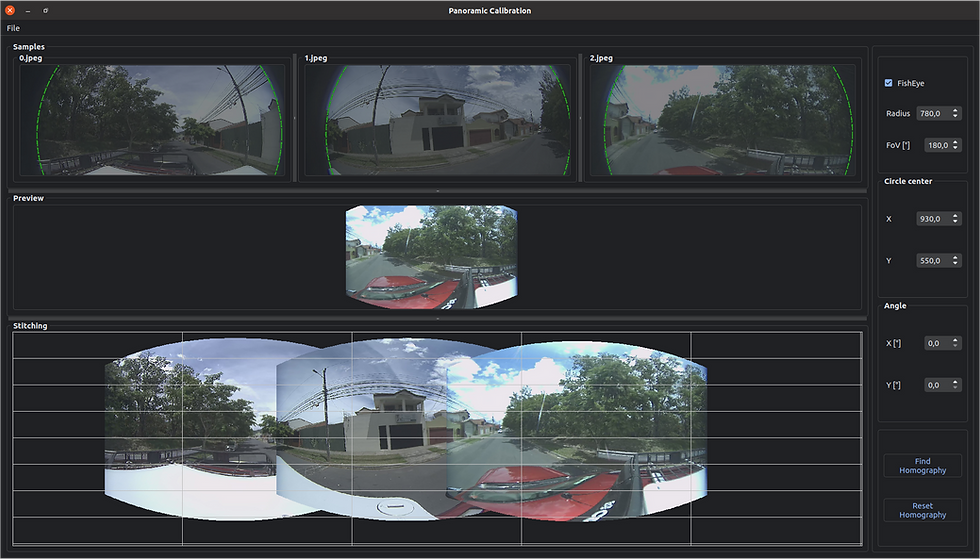
Once the camera setup is well-defined, you need to configure our Stitcher to work with your setup. For this process, we include a user-friendly, GUI-based tool that will help you during the calibration. This is a one-time step necessary to generate all the parameters that will tell the Stitcher all the information about your camera setup. Some of these parameters are the lens field of view (FoV), camera orientation, and camera separation amongst others.
Once these parameters are obtained, you have all needed to generate your spherical video. To achieve this, we provide you with 2 GStreamer elements: projector and stitcher. The projector is the element taking care of performing the equirectangular projections for all the cameras while the stitcher takes these projections and generates the final spherical all of this in real-time.
A Practical Example
Now let’s have a look at a practical example. The following picture shows an array of 3 cameras with 180-degree fisheye lenses with a separation of 120 degrees from each other.

In order to perform the calibration, we need
to take a snapshot using the 3 cameras simultaneously and give this to our calibration tool to obtain the parameters needed for the spherical video generation.
With these parameters, we can now run a GStreamer pipeline that will generate your spherical video. Take this one as an example.
gst-launch-1.0 cudastitcher name=stitcher sink_0::top=300 homography-list="`cat homographies.json | tr -d "\n" | tr -d " "`" filesrc location= ~/video0-s0.mp4 ! qtdemux ! queue ! h265parse ! nvv4l2decoder ! queue ! nvvidconv ! rreqrprojector center_x=963 center_y=558 radius=788 rot-y=-3.6 name=proj0 ! queue ! stitcher.sink_0 filesrc location= ~/video0-s1.mp4 ! qtdemux ! queue ! h265parse ! nvv4l2decoder ! queue ! nvvidconv ! rreqrprojector center_x=918 center_y=546 radius=782 rot-y=2 rot-x=0 name=proj1 ! queue ! stitcher.sink_1 filesrc location= ~/video0-s2.mp4 ! qtdemux ! queue ! h265parse ! nvv4l2decoder ! queue ! nvvidconv ! rreqrprojector center_x=933 center_y=557 radius=782 rot-y=1 rot-x=3 name=proj2 ! queue ! stitcher.sink_2 stitcher. ! perf print-arm-load=true ! queue ! nvvidconv ! video/x-raw\(memory:NVMM\), format=NV12 ! nv3dsinkAnd just like that you have generated a spherical video. Keep in mind that these elements are hardware accelerated so you will get real-time spherical video.
What’s Next?
Stay tuned and check out our developer wiki for more information.


